Using up the stash

I find that as time goes on, my scrappy stash is growing by leaps and bounds.  Part of the reason is that I seem to stay pretty busy during the day with work, so I simply do not get enough time in my craft room.  The other reason is a pretty common one: I need all the things 🙂  It’s pretty tough to resist all of those great products out there.  I am trying to limit myself to just my Hip Kit subscription and one on line purchase a month.  That has been a challenge.  So going forward, my goal is to use up as much of my stash as I possibly can.

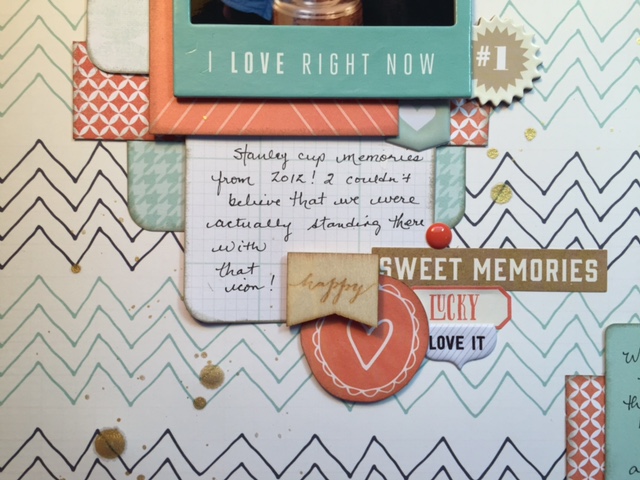
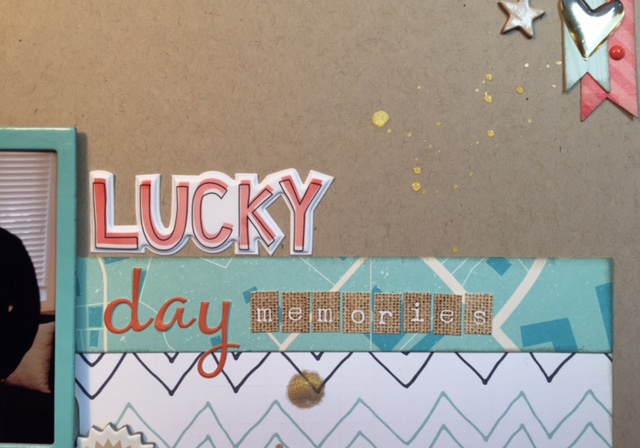
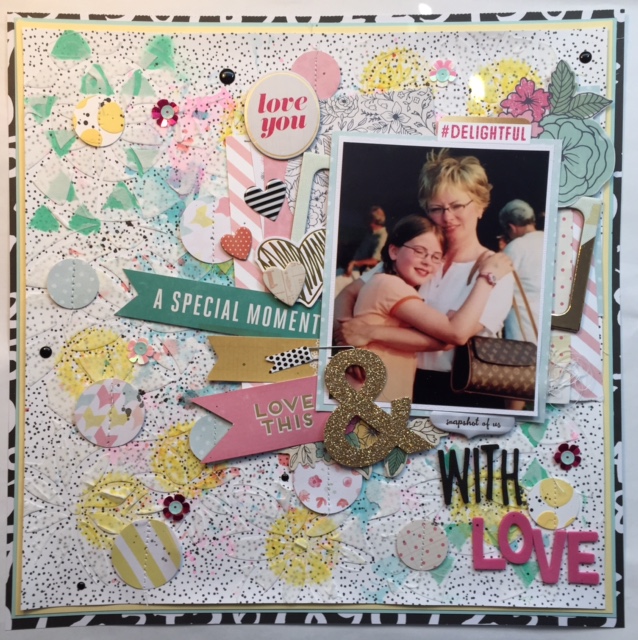
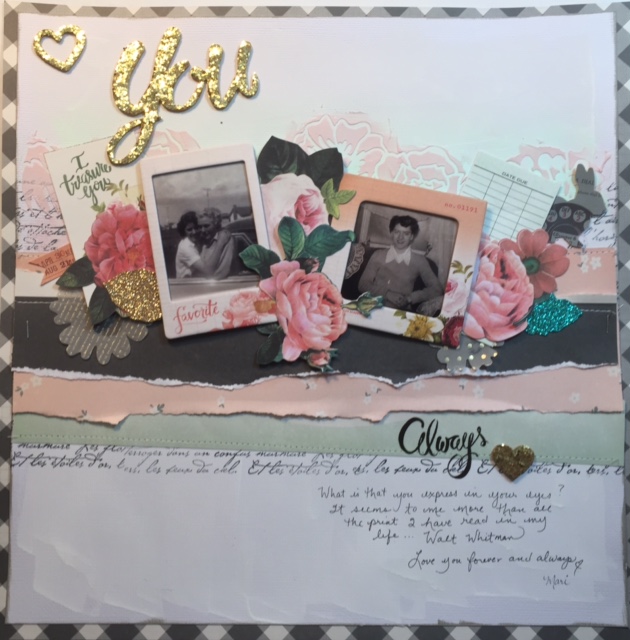
This month, one way I will tackle this lofty goal is to work on some projects that will force me to dive into my stash.  I started a mini album today that will get me into those summer papers and embellis, but I also worked on this layout I am featuring on my blog today.  My goal was to use some of the supplies from my January HK, in fact I used an entire sheet of rub-ons on this one layout!!  I was pretty happy with how that turned out.  The January kit had some very nice products from the My Story collection from MME.  I love that collection. So I found a picture that would work with the collection and off I went on a creative journey to create the feature layout for this blog post.  I have included some still shots and the video link below.

Thanks for stopping by my blog today!!  Have an amazing day!!

XX Mari

Jankit1
The wonderful thing about the Hip Kit is everything you need for embellishing is in the kit and coordinates with all of the pieces/papers.  You can create the most original projects by using the supplies in a new and interesting combination.

Click the play button on the video link above to see the project in progress!!

Prompted: Creating Projects With Prompts

Finding inspiration is often a struggle when working on projects.  Inspiration can come from many things, for example you may simply be inspired by a photograph.  But there are those times when inspiration just simply seems no where to be found.

What I have decided to do to deal with this is to create a book of prompts.  My prompts may be anything, for example a quote, a mood board, a word, etc. I have several projects created for my Prompted series on YouTube.  I will include some photos and some video links for you to check out.  I am hoping this will help you too when you get “stuck” in your crafty ventures 🙂


Wonder
This photo is a close-up of a recent art journal layout I did.  The prompt was “messages for my children”.  I titled this layout “Listen Close to Me”, which is a line from the Shel Silverstein poem on the layout.  This layout focuses on children and I wanted the images to be whimsical and fun, almost as though a child had created them.

Here is a link to the video:

Fall Fun

It’s hard not to love fall, I know, but I am really not a fan…and I will explain why.  Fall for me means that on its heels will be winter, soooo…since I am a commuter, this is not a good thing.  Despite the fact that fall foreshadows winter, I do really enjoy all of the great parts about fall.  I love the fall colors and the fact that October brings Thanksgiving.  I love that we do many unique and fun family things in fall that we don’t get to do other parts of the year.  I guess what I am trying to say is that I enjoy the season, I just don’t enjoy what comes after.  I created a fun fall art journal page which will be up on The Crafty Maven Getaway on October 23.  I have included a sneak of the layout.  I hope to get my October Hip Kit this week and then I will be scrapping some photos I took when my kids were home for the holiday.  Thanks for stopping by!

IMG_3446

Finding the Fun in Creating

It has been a loooong time since my last post…where has the time gone??  The life of a teacher in May and June is completely consumed with all things school related.  The month of July has been spent getting caught up on rest and fighting a flu bug.  Now I am looking forward to getting back to a consistent bit of time in my craft room to find some fun in creating.

One way I have achieved that recently is by exploring art journaling.  The addition of this adventure into my crafty life has been so much fun.  The beauty of art journaling is that it can be what ever you want it to be.  There are no rules…really.  Some of the products have rules, but they will let you know what they are and quickly correct you when you make a mistake 🙂  That’s all part of the fun.  One could take a class or two or learn from the experts, but sometimes part of the fun is in the mistakes that are made.  Sometimes some fabulous pieces originate from errors made. I will put the links below to art journaling videos on my YouTube channel.  Please leave a comment or question below 🙂

Creating a Vintage Look

bobunny
This is a vintage layout that I created and plan to frame as a piece of wall art.

Vintage art pieces are very appealing to me.  I’m not sure what it is about vintage themes that I love so much, but creating vintage pieces make me excited to try new things.  I love the idea of taking aged elements and combining them with modern elements to create that juxtaposition of something new and interesting.  There are so many gorgeous products on the market to create this type of art.  Prima has some lovely products that just seem to call my name.  The paper that I used in the “Adore” layout is from Bo Bunny (Isabella). I absolutely love it!!  If you get a chance, go to an online store and check out that product line.

Creating a vintage look with mixed media is not that difficult.  It just involves some time and some layers.  Adding gesso and gel medium to the products provide a good base to add your layers on to.  Then it’s just a matter of deciding what you want to add for media.  I love all things Tim Holtz and Ranger.  There are so many great inks, pastes, markers, mists, paints, etc., etc.  In the “Adore” layout I use: Tim Holtz stamps, Distress Inks, Distress Paints, Tim Holtz Stencil (Harlequin), Pearl stickers (Stampin’ Up!), Jolee’s Boutique stickers (Fleur de Lis), Bo Bunny stamp, Faber Castel gesso, Gelato (pink), matte gel medium, Archival Black Ink, American Crafts white card stock, Gold Color Shine, Vellum, Stampin’ Up! gold embossing powder, Versamark ink, foam tape adhesive.

I had so much fun creating this layout!!  The video link below is a tutorial that explains each step to create this piece.  I love how it turned out and I am going to frame this one for the wall.

Thanks so much for stopping by!

Living the Dream!

Do you remember your twenties?  I can…just barely 🙂  Maybe some of you are there now (lucky!)  I have two adult children in their twenties and they are certainly enjoying life…in fact I would have to say that in many ways they are living the dream.  They might disagree, but I don’t even think they visit my blog, so that’s OK 🙂

I love doing Project Life(PL) layouts.  I really think that 12×12 layouts and PL are the perfect companions, in fact I would compare them to peanut butter and jelly.  They just go together.  PL documents those every day kinds of events and 12×12 can focus on some one thing that you want to focus on.  Really you can make them to be what ever you like.  I am not a 12×12 snob, only professing to do that ratio and never venturing into the PL world, LOL.  I love to do both and definitely have both types of layouts in my albums.  I do not put boundaries on my scrapping.  I do what ever I feel like.  I don’t want it to become a chore or a job…I have lots of those already.  So in my craft room, guess what?  I think I am living the dream 🙂

This PL layout was inspired by my son’s recent vacation to Banff National Park in the beautiful Canadian Rockies.  He and two of his other engineering buddies loaded up into the truck on a Thursday after work and trekked off to the mountains for a weekend of fun. Well what is a mother to do but to text the girl that was on the trip and have her send me some photos 🙂  Sure enough, she did!!  So I got to do some scrapping of my son’s trip.  PL was the perfect fit.  You can scrap a bunch of photos in a double page spread (DPS) in a short time, and voila, you have documented yet another great event!!

I don’t have still shots of the layout, but I do have the link to the video!!

Balancing Your Layout

Balancing the space on a 12×12 layout can be daunting…there is so much area to think about in a 12×12 ratio.  If you can imagine grid lines on your paper, the grid lines will help you organize the elements on your page according to the sections of the grid you are populating with design elements.  The cool thing about “we scrapbookers” is that we can usually see with our eye what “looks good” and what doesn’t.  Once again, I will repeat myself by saying: trust the experts.  Watch some of the pro’s on YouTube (like Shimelle Laine or MercyTiara) who will teach you some great tips and skills regarding design.

This layout shows how you can use a variety of clusters on your page to create an interesting layout.

acup1
For example, this picture of the layout shows a cluster at the bottom of the journaling card which completes the white space that was trapped in this area. It also draws the eye to the journaling itself.
acup3
The cluster in the top right corner balances that area and the layout in general.
acup5
Here is the finished layout. You can see that I have included clusters of embellishments at the corners of the two focus areas on the layout and then added the title on the horizontal line across the page. The bold patterned paper background on the bottom 2/3 of the layout features that fun paper by Crate Paper and the Craft Market collection. Have I mentioned how much I love Crate Paper??

Here is a link to the Process Video:

Mixed Media Fun

Getting into the mess of mixed media is a bit frightening at first, but once you get the hang of it, you will never look back.  If I were forced to choose one way to scrap, I likely would choose layouts with some mixed media.  It’s just so interesting to me how you can create so much completely original art with just a few products.  You don’t have to spend a fortune to start doing some mixed media projects.  You can purchase a basic water color palette at many craft store chains for under 5$.  All you need is a glass of water and a cheap brush and maybe some plastic packaging and you are ready to attack some paper or canvas.  The layout I am sharing in this post has a totally original background.  I used water colors, an acrylic paint dauber, a stencil, and some stamping to create the piece. I also used a circle punch and some sewing.

aottawa6
There is a lot on this layout, but the colors are muted enough that the focus is still the photo, which for me is a must. I still have to add some journaling on to this layout. I haven’t decided how to do that yet. Leave me a comment if you have an idea 🙂

Here is the link to the Process Video:

Happy Mother’s Day

Mother’s Day is a special day…it became even more special for me 23 1/2 years ago when I became a mom.  My family spoils me, that’s for sure, and they always do something special for me on Mother’s Day.  The trouble for me is that almost four years ago, Mother’s Day changed for me when my mom passed away.  We were very close and I miss her like crazy every day, so Mother’s Day just doesn’t have the same shine for me anymore.  I finally decided this last week to try to do some scrapping with some photos of my mom.  I really enjoyed it and I have decided to do more.  I made this layout with the Maggie Holmes Open Book collection…I love that line and all things that Crate Paper makes.  I have been hoarding this collection and it is just perfect for these vintage photos I chose for the layout.

This layout is exactly why I love to scrapbook!  I am able to document stories that are meaningful and the process is totally cathartic.  When I am stressed, I love to scrap…but I love to scrap when I am not stressed, too 🙂  It is such a wonderful craft!!

amomday5
I used mixed media on this layout, including acrylic paint, texture paste, stamping and stenciling. I did a little bit of sewing on the layout, too. The papers and embellishments are all from Maggie Holmes Open Book by Crate Paper.

Here is the link to the process:

Layering Fun!

One skill that seems to be essential in almost every layout is the art of layering.  Choosing the right combination of paper or other materials and layering them just right for a certain look can be a challenge.  Something that I have learned is that you just have to be willing to take the time to try a lot of different things to get it just right.  Don’t be afraid to use other scrappers’ layouts for inspiration.  This is a great way to start to learn.  Once you have watched people do their layering, you slowly get to be more confident and are more able to sort it out for yourself.  Another great idea is to use a sketch.  There are tons of sketches out there on social media.  One great resource is Pinterest.  Pinterest is easy to use and full of great ideas.  There is a link to my Pinterest boards up to the right on this page.  My Project Life/Scrapbooking board is full of ideas, including sketches.

Here is a recent layout I did  using some layering:

anoodles3
This was a fun layout with some layering. I used some long, narrow pieces behind the photo layer and cut them into banners. I off set them to create the layer behind the longer horizontal photo layer. This creates a base for the layout and encourages the eye to focus in the center, which is where the photo rests. I love how this turned out!

Here is the link to the video: